Thursday, September 20, 2012

Using cheap props to make great photos


Using cheap props make for some great photos.  Especially when it comes to taking portraits of kids.  It's one way to get them to have fun which creates great smiles.

My personal favorite prop is the balloon.


You can use large industrial sized helium filled ones.  Instant fun.


OR, simple balloons you can get from the grocery store that you blow up yourself.


Just make sure you supervise the children, expecially babies with balloons.  Never let babies bite the latex balloons.  They can pop when they bite them and it scares the baby so he inhales quickly and ends up choking on them.  So this is a very short balloon portrait session.  Long enough to get the picture, then off to a new toy.


Other prop ideas:

1. Cardboard box-made to look like a car or airplane
2. long piece of fabric to make a cape-"Super Boy!"
3. tea sets for a tea parties
4. too-too's for little girls
5. anything that sparks their imagination

Until next time, happy snapping.  And be sure to visit www.miragesbymarilyn.com for more beautiful pictures.

Wednesday, September 12, 2012

How to make a pictured growth chart

I think every mother should start a growth chart early on in their kids' lives.  It's a great way to document how fast your child is growing, and have fun while doing it.  But more special is a growth chart that also shows the child's picture at the time the growth was documented.  Folow this step-by-step guide to making one so that one day your child will be able to enjoy seeing how he or she grew up.

Step 1: Pick a good spot

I picked the door to my kid's room.  That way we see it regularly and are reminded that everyday must be cherished because they won't be little forever.

Step 2: Make a colorful background


I used construction paper (pretty basic, huh?).  Just as long as it is a steady background, any colors or materials will work.
Step 3: Make a centered line to mark their growth on


Add more contruction paper to make a straight verticle line.  Choose a color that will stick out from your background.
 Step 4: Mark you kids growth


Step 4: Add a picture that goes with that growth period


You can add stickers to make it fun too.  The point is that you not only see how tall your child was, but also what they looked like at the time. 

 Hope you had fun with this momtography trick and stay tuned for more terrific ideas to documenting your childs growth, which lets face it, is the whole reason why we do this photography for mother thing.  Until next time, have fun and visit www.miragesbymarilyn.com for more beautiful photographs.

Sunday, August 19, 2012

Refrigerator Pickling

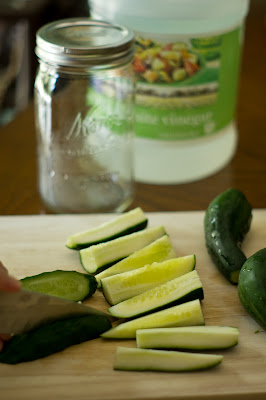
This year we decided to plant some pickling cucumbers in our garden and they are yielding some beautiful results.  Here is a recipe I got from this site.  I captured the process of making them, and the outcome was delicious.  You should give it a try if you ever decide to garden pickling cucumbers.


It's so simple.  First you gather all your ingredients:
*Pickling Cucumbers (of course)
*Mason Jar
* 3 Tbsp of Vinegar
* 2-4 cloves of garlic
*5 sprigs of fresh dill
* kosher salt
*tsp whole pepper corn

Cut the cucumbers into spears


Dice up your garlic

Put every thing into your jar, fill to the top with water, shake it up and store.  After 24 hours, turn upside-down
then wait another 24 hours.  After the 2nd 24 hrs you can eat them.  That's it!  Fresher pickles than from the store.  Make sure to refrigerate it.  Should stay good for up to a month I'm told.

For more beautiful photography stories visit my professional site at www.miragesbymarilyn.com


Tuesday, July 3, 2012

Composition lesson #1: Where to put your horizon?

One of the simplest ways to make your travel photos more interesting this summer is to remember "the rule of thirds."  If you divide any photograph into three sections, whether is be land and sky and trees or people and building, etc. it is more interesting.  The best way to teach this is to show examples so her ya go:


DON'T put your horizon smack dab in the middle of the picture.  Splitting your photo composition in half is not pleasing, nor interesting to the eye.


It looks much more artistically interesting to move the horizon either down, filling your page with the focal point


Or move your horizon up so that you have a more interesting composition.


This is just a principle to help you take better photo's while traveling and sightseeing this summer.  Mostly remember to have fun.  Until next time, keep on shooting and go to http://www.miragesbymarilyn.com/ for Michigan Portrait and Wedding Photography.


Thursday, June 7, 2012

Travel Files: Portland


The city's vibe has the coolness of Chicago mixed with the friendly, low key hospitality of Nashville.  Portland Oregon is known as "The City of Roses" but should be called "The City of Trees."  This treasure of the Pacific Northwest is laced with big, beautiful 100-year-pines throughout, although the roses also have a great presence and only adds to the beauty of the City. 


Make sure to bring your rain coat.  No one uses umbrellas in Portland but it can rain at any given moment.


A pink rose at the International Rose Test Garden in Washington Park


Because the Portland area has a law that prohibits development outside the city, their is no urban sprawl and you can go from urban to mountainous countryside in 5 minutes.  These are just a few of the beauts I got while visiting the ever famous "Gorge" of the Columbia River.

What makes Portland a great place to visit is not just the beautiful landscape but the people.  I noticed that everyone has a general positive and down-to-earth disposition, but then again how could you remain stressed being surrounded by such a calming and natural atmosphere?  Filled with environmentally conscious bikers and earth friendly folks, even the fast food places have a waste disposal system of three buckets entitled "recycling," "compost," and "landfill."  My personal favorite was to visit the ever famous Hawthorne Village and people watch the "Hipsters."  Everyone dresses like they're an artist and their body is their canvas.

Not to mention the beer.  No not beer, but BEER!  Like "wow, that is really good freakin' beer." The microbreweries cater to such a refined taste that I don't think I could ever drink a bud light again.  My personal favorite was Rogue, which is a dark porter that had just the right mix of mildness and flavor. 

Monday, May 14, 2012

TIME Magazine's "Are you mom enough?" article


 We all heard or saw the cover on TIME magazine this month of the mother breastfeeding her three-year-old in an awkward, un-natural, and controversial manner causing quite a stir and opinions to be voiced on just how discusting or awkward or what the "right parenting way" should be.  So, this is my chime in on what I think is going on.

First off, I actually read the article and found the cover photo's not exactly what Bill Sears, the author of The Baby Book is actually saying to do.  The controversial picture is just an attention grabber, a publicity stunt from the media that is hoping to exploit Sears' idea in order to make a story.  It got you to talk about the article, and TIME magazine is loving all the attention.  That's just great.  At the expense of the three-year-old.  I wonder if the mother who signed the model release to allow the people of TIME actually knew they were going to be portraying her in this manner.  If so, she should know that the poor kid will no doubt be ridiculed and harassed into his school years and beyond for having an extreme decision that his mother allowed to be documented for the whole world to see.  Breastfeeding is great.  But, it's not that she's breastfeeding that I have a problem with, or even breastfeeding at a late age. What I have a problem with is that the mom has agreed to put it on public display in such a manner to make it out to be unnatural.  A lot of women in other countries breastfeed into toddlerhood.  And, it's become more popular in America over the years.  In my opinion, three is a little too old but it's other mom's choice if they want to do it that long or not. That's their right and it's okay as long as they aren't putting it in public display so that photographers and the media can skew it anyway they want.  Though, pprobably any older than three I can see it causing a lot of developmental problems.  What was that Erickson's Stage of learning again? Oh yeah, autonomy vs. shame and guilt.  Probably should let your kid develop some autonomy instead of breastfeeding them into kindergarten but that's just my opinion.  I'm not ridiculing the moms that choose extended breast feeding, I'm ridiculing the media for making it out to be criticized.

So what is this attachment parenting article actually talking about?  It condones three things: breast feeding, co-sleeping with your baby in bed, and "baby wearing" (putting baby in a sling).  And you know what?  I do all of those things and so do most mothers I know in varying degrees.  I can't speak for why other moms do it, but I do it because I am listening to my instincts and that's what parents should do. Listen to your instincts.  I don't need permission of new trends like "attachment parenting."  I always knew at an early age when I was a little girl playing house that I would keep my baby close in a sling.  Like the Native Americans and many other cultures did.  It looked so cool.  It wasn't a trend then. I have been ridiculed by my kid's pediatrician for having the baby sleep next to me in bed because statistics show this and that.  Well, I am very careful and would never do anything that I thought would harm my kids.  But if you don't think you could sleep next to your baby without rolling on top of them without knowing, then you probably shouldn't sleep next to them.  So more or less, I actually am doing attachment parenting and didn't realize it until I read this article.  So are a lot of other parents, and now the media has created an uproar by the public, giving way to more criticism.  As if that's all a mom needs.  Pictures are very powerful and the problem is that people see this cover on TIME and think "breast feeding's gross" or "that's too old, he's standing on a chair." But I think we need to just see it for what it's worth before jumping to conclusions on mothers that breastfeed into toddlerhood: a posed portrait aimed to get a strong reaction from the audience.


Please visit my professional blog at www.miragesbymarilyn.com/blog for beautiful photography of families and children.


Tuesday, April 24, 2012

Learn About Open Shade
The biggest misconception I find people make with photography is that the more sunlight during the day, the better your picture.  I see a lot of people taking their photos out in high noon because "there's lots of light.  The sun's coming from that direction so face it and we'll be sure to get a good picture."  WRONG!  It may look good to you but on camera it's pretty ugly.  When the sun's up high in the sky, like at noon, the shadows fall on people's face and give a hideous appearance, similar to a scary movie.  Not to mention that squinty eye look is just fabulous.

Cute boy, I know :) but the shadows falling on his face are not the best for portraiture.  Now imagine if it was someone not so cute. (wrinkles anyone?)  I have made some mistakes with some adults but would never use them for example because they were just that unflattering. 

How do we fix high noon sun?

Never shoot at mid-day?  No, there's not always that luxury.  Lots of good things go on at mid-day.  Weddings, birthday parties, life, etc.  Here are some fixes:

Open Shade

This photo was taken right after the previous, only this time under a tree.  The shadows are softer, and you have a much more even light.  Make sure they are all the way under the shade, not half and half.

Put their backs to the sun

You get that even light with a little highlight around their hair like we talked about here.


Now to close, I would just like to add that there are always exceptions to this rule, and a matter of taste.  Some situations may look good in the mid-day sun but I am just trying to shine some light (no pun intended) on the mistake I see so commonly made because people haven't yet heard of "open shade."  Until next time, keep on shooting and keep on learning.

Monday, March 26, 2012

How to Take Pictures of Spring Flowers: Get close. Closer. As close as you can get!


There's nothing like spring time in Michigan.  The light at the end of the tunnel.  We have all been couped up in our cabin-fever ridden homes all winter and now can't wait to get outside and start enjoying the sunshine.  One of my favorite ways to do this is to appreciate the daffodils.  They mark the beginning of spring and they don't last long, so get a picture while you can.  Here is a little tip to getting great flower shots to avoid them from being, well, boring.  If your like me, I hate boring photos.  So lets take pictures that depict how spring really makes us feel: excited that winter is finally over!  We want bright, vivid colors.  A beautiful bokeh of blurs in the background to emphasize the beautiful blooms we see outside in our gardens.  Here's how to get that bokeh.


As you can see by this photo, the flowers just don't pop off the page like the close-up pictures do....BORING.

 To get them to pop and have that pretty, blurry background you need to get closer.  As close as your lens will let you.  The closer your subject is to your lens, and the farther your background is from the subject, the more blurry your background will become.  Hence, flowers look sharper by comparison and they "pop" right out.

This is a shot of the same flower, only closer.  It pops out by comparison to the blurry background.

You can also do this with leaves.  Here is a shot of fresh tree leaves from far away.

Nice, but BORING!


This one's a lot better because it's closer and gives you a point of interest to focus on

The background is far away and blurry just like we talked about.


Here is another way to work with bokeh.  Have blurs not just in the background but in front of your focus point, making pretty foreground foliage.


So that's it for today's lesson.  Be sure to check out my blog at my professional website to see more projects I'm working on.  Thanks for stopping by!

Sunday, March 18, 2012

Backlighting: seperate your kid from the background

Hey momtographers, here is a cool tip I am sharing that is sooooo easy.  You know how people use to say "don't take a picture of someone with the sun behind them."  Well, rules were meant to be broken and breaking that rule is totally the hot new trend in photography. I'm seeing this more and more now days so   I'm going to show you how to do it. 

First stand so that the sun is right behing your kid.  The time of day matters.  The closer to sunset or sunrise the better.  That time of day, the sun is right at the horizon shooting across direct sunlight.

If you have camera controls that allow you to go under this mode then select "back lit"so that your kid's face will get well exposed.  If you have a manual camera, set your exposure for the shadows (the darkest part).  If you get the exposure for the face right, you end up with this great outline that highlights your kids hair and sets them apart from the background.


You can also put your camera in "fill flash" mode to expose for the face and fill in the shadows but keep the hair light.  This also gives an extra sparkle in your kid's eye's from the reflection of the flash.


So that's it.   Now you know another very easy trick to making photography that much more fun and interesting.  Until next time, goodbye!


Friday, March 9, 2012

Panning: have fun with your kids while getting great shots


After reading the blogs of mothers who love photography, I've noticed one recurring theme: we struggle to have time for photography.  In fact, it took me 10 minutes to write the previous sentence.  Mother's know what I am talking about.  One arm is holding a baby while the other is wiping the nose of a two-year-old, all while talking on speaker phone and thinking about what we're having for dinner tonight.  So this photography skill is actually a fun one you can do while playing with your kids.  Panning, AKA
"motion blur", is a technique seen mostly in car commercial photography or sports, but when applied to a kid some fun things can happen.  The background of streaky blurs depict movement (what toddlers and kids do so well) while the subject is in focus.  Here's how you do it:

1: Get down at the level of your child.  This method works great for any technique because you get a better angle at eye level, but you get better blur this way


2: One thing you will notice is that I will always shoot in manual mode.  It will give you more control and this method is all about control.  Set your shutter speed as slow as you can go handheld.  I generally like 1/60 of a second to reduce camera shake for anything handheld. However, the above pic was able to be squeezed down to 1/50.

3: The most  important step is to pre-set your focal length.  Do it anyway you want, but this is what's fastest for me.  I generally like to autofocus on something at the spot I will snap the pic in and then turn off autofocus so it doesn't get readjusted during the subject's movement.  Pre-focus on a toy, a book, whatever, as long as it gets your camera to focus on the space that your little one will run in when you click the shutter.  When I know the focus is set in the right length, I tell my little guy to run "on you're mark, get set, GO!" He has a blast, and so do I! 

4: Have your kid run from one end of the room to the other while you are in the middle of his "bee line" and when he comes right in front of you snap the picture while moving the camera parallel to the direction he's heading.  This part is important too, because it makes motion blur possible.


So that's it.  One simple way to make your photos unique and have fun with your kids.  I hope this helps you moms and dads out there and watch for future postings on how-to's of photography with kids.

P.S. and easy way to do this with a baby or with a kid that won't cooperate, is to hold the baby in a sling while turning and clicking the pick. The background is moving while the baby is going at the same speed you are.


To see a blog of recent professional work, go to http://www.miragesbymarilyn.com/blog